Introduction
Back in 2011 I wrote an article about hosting webservices on Windows Embedded Compact with gSoap. I recently got some comments on this article and I am happy to notice that this subject is still relevant. The article written back in 2011 was targeted for Windows CE 6.0, and so I decided to redo the article for Windows Embedded Compact 7 (WEC7) and Windows Embedded Compact 2013 (WEC2013) including the latest version of gSOAP.
In fact for WEC7 you can just follow the original article as the environment (VS2008) has not changed. Due to an update of gSoap a modification is needed in order to make things work again. This modification, stubbing the time() function, is also needed for WEC2013 and therefore this article is mainly focused on WEC2013. A note is given in this article which part is relevant for WEC7.
The sample code provided has been build and tested with our iMX6 SDK, and the target used is the SABRE-Lite board. You can download the bootloader, the kernel (nk.bin or nklz4.bin) and the SDK for all of our supported platforms here.
You can find the source code attached to this article for both WEC7 and WEC2013. In order to use the attached source code you will need to install the GuruCE i.MX6 SDK and download the gSoap source code.
As said this article is based on the hosting webservices on Windows Embedded Compact with gSoap article and you can find the complete source listing in the original article. This article assumes that you at least have read the article
Windows Embedded Compact 2013
A lot has changed with WEC2013 and therefore I will discus the steps of how to (re)create the HelloWorldWebService application for WEC2013. The HelloWorldWebService application is a web service running on an Windows Embedded Compact 2013 device. We can reuse the desktop client application created in the previous article as long as the wsdl did not change. If the wsdl file has changed you need to open the desktop client solution and update the service reference in the solution explorer. This article assumes that the wsdl file has not changed and this thus means that you can use the desktop client application without any modification or rebuilding!
For this article we will use version 2.8.44 of gSoap which is the latest version at the time of writing this article. gSoap has been modified which causes the sample code, listed in the previous article, not to build anymore. We will explain how to fix the compile error in this article. With WEC2013 the development environment is Visual Studio 2012/2013/2015 which requires some modifications needed as well.
Create the native c++ gSoap webservice application for WEC2013
As a reminder; the steps to follow:
- Import the WSDL in a new project
- Let gSOAP generate a header file via wsdl2h.exe
- Let gSOAP generate the corresponding implementation *.cpp files via soapcpp2.exe
- Implement our methods
Step 1: Import the WSDL in new project
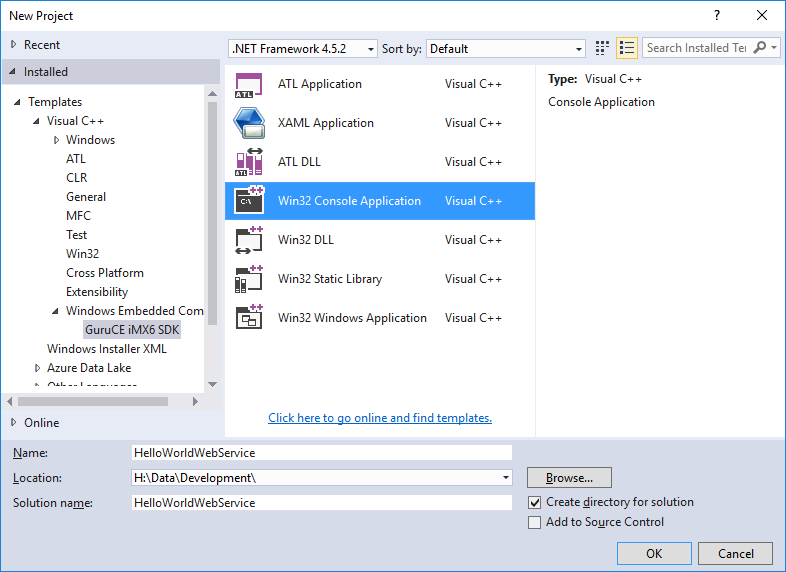
Open Visual Studio 2012/2013/2015 and create a new C++ smart device project (File | New | Project) and enter HelloWorldWebService as the name of the solution. In the "New Project" Dialog navigate to the Template "Templates | Visual c++ | Windows Embedded Compact | GuruCE iMX6 SDK" and select the "Win32 Console Application".
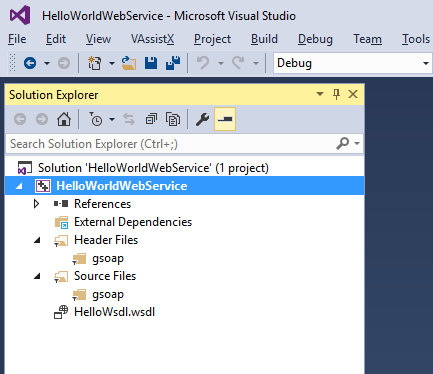
When you click OK the project is being created. There is no longer an option to select an empty project and thus you will get stuff for free here. This means we need to modify the project we just created, in order to reuse the same sources files which we used in the previous article. We also want to be able to use the same source files for WEC2013 and WEC7.
- First delete all source and header files which were automatically generated by Visual Studio's "new project wizard". e.g. right click on stdafx.h and choose remove | delete.
- Add the gSoap filters for the header and sources files (right click on header files and choose "Add | New Filter" and choose "gsoap" for the name of the filter.
- Create a new file called HelloWsdl.wsdl, copy the wsdl contents from here and import the file into the solution.
The layout of the solution should be looking like this:
Step 2: Let gSOAP generate the header file from our wsdl.
First download gSOAP in order to get the tools needed. You can download gSOAP from here.
Make sure you save the extracted files in an appropriate folder for you to remember because we need references to this folder within our visual studio project later on. I’ve put the gSOAP tools in the $(SolutionDir)
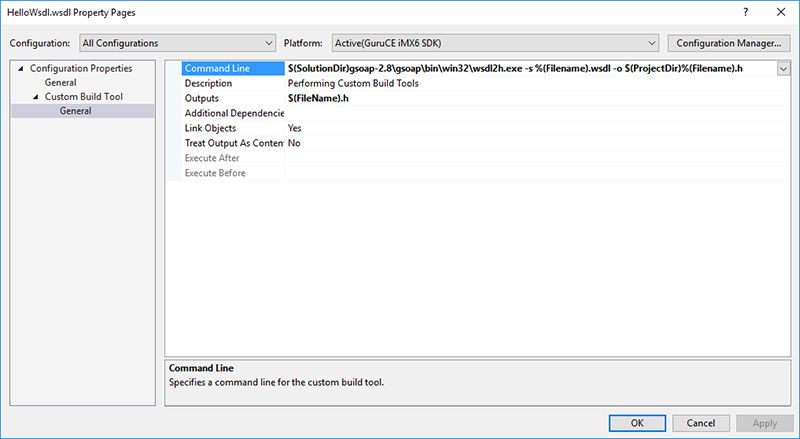
In the solution explorer in Visual Studio 2015 right click on the just imported wsdl file and select properties.
Select "All Configurations" for the configuration.
In the “Custom Build Tool“ pane, add the following command (make sure you get the path right and that the solution directory doesn't contain any spaces) in the “Command Line” section:
$(SolutionDir)gsoap-2.8\gsoap\bin\win32\wsdl2h.exe -s %(Filename).wsdl -o $(ProjectDir)%(Filename).h
!The macros in Visual Studio 2015 have changed compared to Visual Studio 2008!
This will run the wsdl2h.exe to generate our header file. The parameters specify the input and output file. In the “Outputs” field on the property page enter: $(FileName).h
Click “Apply” and “OK”, and then right click the wsdl file again and choose “Compile”.
Now our header (HelloWsdl.h) file is generated in the project directory, and we need to add this file to the project. In the solution explorer right click on the “gsoap” folder in the header section and choose “add existing item”. Navigate to HelloWsdl.h and add it.
Let’s do the same for generating the cpp file:
Step 2: Let gSOAP generate the cpp source file.
In the solution explorer right click on the HelloWsdl.h, that we just added in the previous step, and select “Properties”. In the “Custom build Tool“ add the following....wait, where is the "Custom Build Tool" configuration?

*** This is a BUG in Visual Studio 2015 ***
Press "Cancel" or "OK" to close the dialog. Yikes...The workaround is to manually edit the vxproj file (eg. with notepad) to add our custom build action. First save the solution!. After saving the solution edit HelloWorldWebService.vcxproj and look for the tag <ClInclude Include="HelloWsdl.h" />.
Replace:
<ItemGroup>
<ClInclude Include="HelloWsdl.h" />
</ItemGroup>
Into
<ItemGroup>
<CustomBuild Include="HelloWsdl.h">
<Command Condition="'$(Configuration)|$(Platform)'=='Debug|GuruCE iMX6 SDK'">$(SolutionDir)gsoap-2.8\gsoap\bin\win32\soapcpp2.exe -S $(MSBuildProjectDir)%(FileName).h</Command>
<Outputs Condition="'$(Configuration)|$(Platform)'=='Debug|GuruCE iMX6 SDK'">$(FileName).cpp</Outputs>
<Command Condition="'$(Configuration)|$(Platform)'=='Release|GuruCE iMX6 SDK'">$(SolutionDir)gsoap-2.8\gsoap\bin\win32\soapcpp2.exe -S $(MSBuildProjectDir)%(FileName).h</Command>
<Outputs Condition="'$(Configuration)|$(Platform)'=='Release|GuruCE iMX6 SDK'">$(FileName).cpp</Outputs>
</CustomBuild>
</ItemGroup>
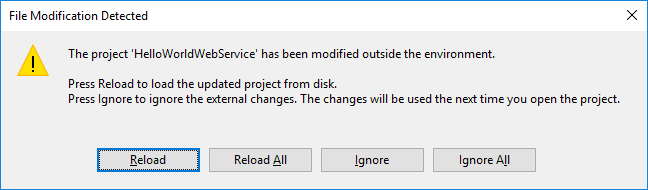
Save the file and go back to Visual Studio. You will notice that Visual Studio detected that the project has been changed. Visual Studio will ask if you would like to reload the project and yes we do: Choose "Reload All":
In the solution explorer right click again on the HelloWsdl.h, and you will see that the "Custom Build Tool" step has been recovered:
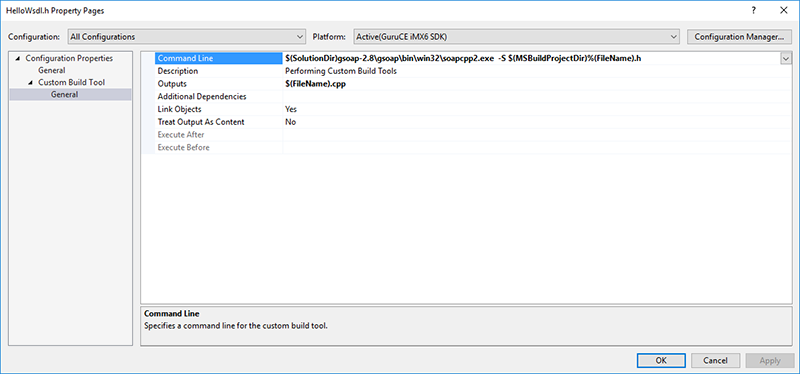
Make sure that the paths are correct! You can see that we are using different macros than we used in Visual Studio 2008. Right click on the HelloWsdl.h file and choose "compile". This will generate a bunch of files as well, but we are not yet ready to build our solution.
Right click the gSOAP folder in the header section in your solution and add these header files:
- soapH.h
- soapStub.h
Right click the gSOAP folder in the source section in your solution and add these cpp files:
- soapC.cpp
- soapServer.cpp
The next step is to add stdsoap2.h and stdsoap2.cpp to your solution. You can find these two files in “gsoap-2.8\gsoap”. Add them together by right clicking the project in the solution explorer and select “Add existing item”. They will automatically appear under the correct “header” and “source” sections.
We’ve added the stdsoap2.h to our solution but we also need to add the directory where stdsoap2.h resides to the project's "include directory list". Add “$(SolutionDir)\gsoap-2.8\gsoap” to the include directory list by right clicking the project in the solution explorer and click "Properties". In the “Configuration Properties" | C/C++ | General” section you will find “Additional Include Directories”.
Now that we’re done generating files we can actually start to code!
Step 4: Implement our methods
Just like in the original article we need to create the source files HelloWsdl.cpp and HelloWsdlMethods.cpp to the solution. Copy or reuse the files HelloWsdl.cpp and HelloWsdlMethods.cpp used in the original article that you can find here! The content of those could be left unmodified!
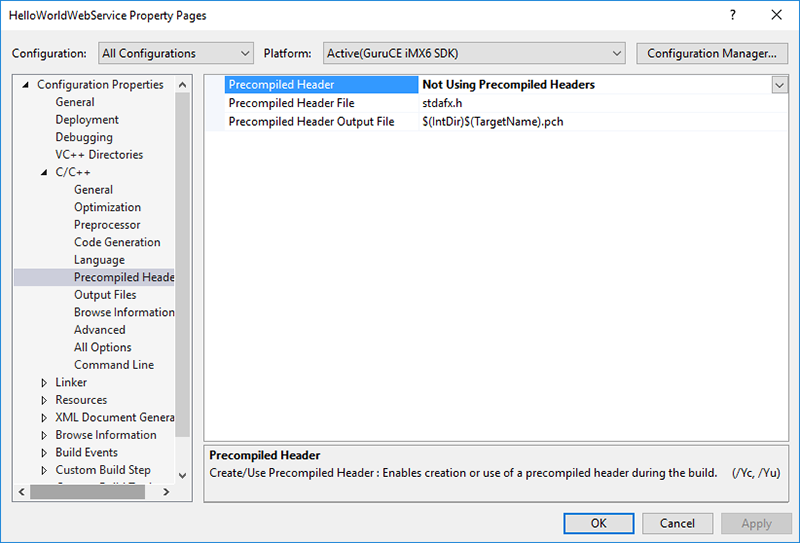
Next step is to make sure that we configure the project not to use "Precompiled headers" because we deleted all those files in the beginning. We also want to be compatible with the WEC7 solution and thus we want to use the same source files. So right click on the solution explorer and navigate to the "Configuration Properties | C/C++ Properties | Precompiled headers". Choose "Not using Precompiled Headers "
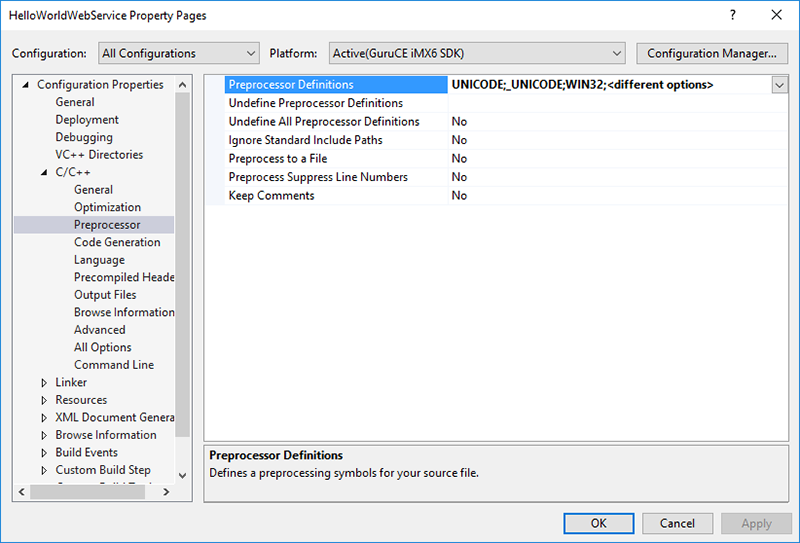
For the same reason we need to add the UNICODE defines to the preprocessor definitions. Navigate to the "Configuration Properties | C/C++ Properties | Preprocessor". Add the UNICODE and _UNICODE definitions to "Preprocessor Definitions"
Now build the solution.... It will fail with the following compile error:
..\gsoap-2.8\gsoap\stdsoap2.cpp(16942): error C3861: 'time': identifier not found
This same compile error will occur when you follow the original article due to the fact that the gSoap sources are changed. For WEC7 you will only have to follow the following steps to make the solution working again
Now when you take a look at the specified line in stdsoap2.cpp the function time() is begin called which is not supported on Windows Embedded Compact. We need to stub/implement this method in Embedded Compact. This require two steps. The first step is to modify stdsoap2.cpp and tell that time() is external. Unfortunately this means that we need to modify the gSoap code and so whenever you update the gsoap package you will need to redo this step.
Open stdsoap2.cpp and add the following snippet just prior the function soap_rand_uuid where the time() function is used.
#ifdef WINCE
extern time_t time(time_t* timer);
#endif WINCE
The second step is to create the time() implementation. Add a new source code (cpp file) called "time.cpp"(right click on Source Files in the solution explorer and select: Add | New Item and choose c++ file(.cpp)). The time.cpp will hold the stubbed time function. You could proper implement the time() function, for example the OpenNETCF time replacement for CE can be found here, but as the method indicates that all it requires is a random uuid and for the sake of the simplicity of this article we will stub this function as follows:
#include
<windows.
h>
extern "C" time_t time(time_t* timer)
{
return(time_t)rand();
}
Copy and paste the above code snippet in time.cpp and the complete project should look like:

As said the desktop client application should just work "AS-IS" as long as the wsdl hasn't changed.
That's it, build, deploy and enjoy!
Steps to follow to build the attached solution(s)
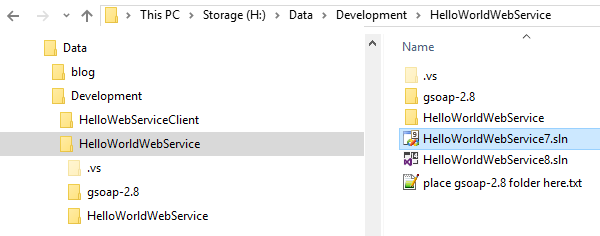
- Download the Webservice sample code and extract it somewhere suitable (In my case: H:\Data\development).
- Download and extract gSOAP into the $(SolutionDir) (So the gsoap-2.8 folder resides in H:\Data\Development\HelloWorldWebService).
- Open HelloWorldWebService7.sln or HelloWorldWebService8.sln depending on your environment.
- Modify stdsoap2.cpp to extern the time() function as described in this article.
- Build the solution.
Folder view:

 We just received a report from one of our customers that saw their high priority thread on WEC2013 not being scheduled for a long time, even though that thread was set to the highest priority in the entire system.