Hosting webservices on Windows Embedded Compact using gSOAP: Uploading a file
By popular demand here's a simple example how to upload a file using a gSOAP webservice. This is a follow up post; for this example you first need to read and implement the code from the first post in this series.
With the base code of the first post it is now very simple to extend that solution's functionality because we've already completed the most difficult part; setting up your solution.
In this follow up blog post I will create a method that allows you to upload a file to the Topaz target:
int UploadResource(String resourceName, byte[] resource, uint resourceId, uint &statusCode);
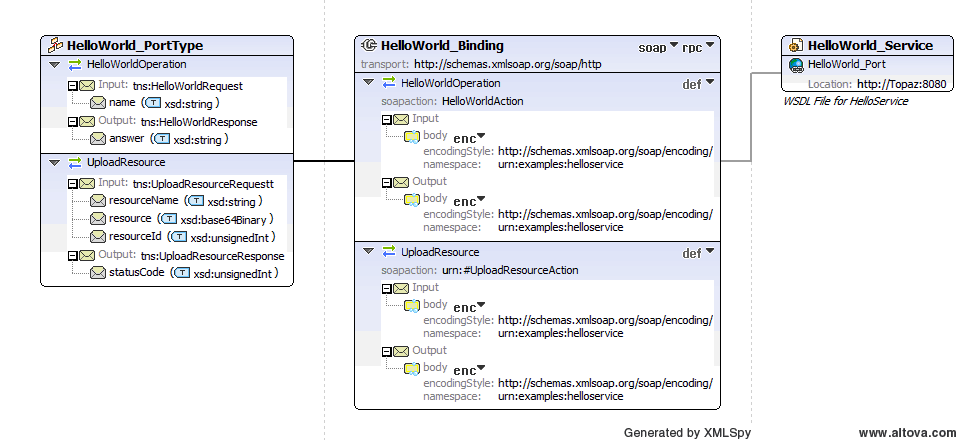
First we need to modify the existing wsdl file (our webservice design). I won't list the entire wsdl file here because it's getting a bit long. Instead I have downloaded a tool that allows me to graphically design my wsdl file; Altova XML spy. Altova XML spy is not a free tool but it is very nice to work with it. There may be some free tools that offer the same functionality as well (let me know if you find one). I opened the wsdl file we created in the previous blog post in this series and opened it in XML spy for modification. After modification it looks like this:

Note the port type "UploadResource" I added (left block under HelloWorld_PortType). I added the input parameters resourceName (String), resourceId (unsinged integer) and a byte buffer for the actual data (base64Binary). I also added an output parameter statusCode. In the code I am not doing anything with it, but I just put it there to illustrate an output parameter. To complete the wsdl design we need to add the encodingStyle and namespace fields for the binding (the middle part of the picture). Just copy'n'paste it from the HelloWorldOperation. For complete reference I've attached the wsdl file to this blog post. It's a good example how to construct your webservice interface. It also shows a wsdl file can get complicated very quickly so a design tool like the one I used is recommended.
Open the existing "HelloWorldWebService" solution we created in the previous blog post. You're now just a few simple steps away from finishing the server side code:
1). Right click the wsdl file and choose “Compile”. Now our header (HelloWsdl.h2). Right click on the HelloWsdl.h file and choose "compile". Again this will re-generate a bunch of files as well.
If you would now build your solution you will end up with some unresolved externals; our newly created method. You can find the declaration of this new method in the generated soapStub.h file:
* *
* Server-Side Operations *
* *
\******************************************************************************/
SOAP_FMAC5 int SOAP_FMAC6 ns1__HelloWorldOperation(struct soap*, char *name, char *&answer);
SOAP_FMAC5 int SOAP_FMAC6 ns1__UploadResource(struct soap*, char *resourceName, xsd__base64Binary resource, unsigned int resourceId, unsigned int &statusCode);
Open HelloWsdlMethods.cpp and add the following method implementation:
{
printf("\r\nUpload resource called\r\nname: %s, id: %d ", resourceName, resourceId);
return SOAP_OK;
}
Don't let the xsd__base64Binary type scare you. It's just a class with some members including:
__ptr: A character pointer to the memory buffer (char* buf) containing the contents of the file.
_size: Contains the number of bytes in the buffer above.
4). Build your solution and run the server code on your Topaz!
The C# Managed Client
In the previous blog post in this series we've created a Testclient application written in C# to test our webservice. Open the "TestWebServiceClient" solution. Add an OpenFileDialog control and a button control to the Form. Call the button something like UploadFile:

Double click on the newly added button which will create the button click event code behind. Now implement the event handler with the following content:
private void UploadFile_Click(object sender, EventArgs e)
{
if (openFileDialog1.ShowDialog() == DialogResult.OK)
{
byte[] data = GetBytesFromFile(openFileDialog1.FileName);
if(data.Length > 0)
{
uint id = 22;
try
{
server.UploadResource(openFileDialog1.FileName, data, ref id);
}
catch (Exception ex)
{
MessageBox.Show("Failed to upload resource" + ex.Message);
}
}
}
}
// Reads a file and returns the content as a byte[]
public static byte[] GetBytesFromFile(string fullFilePath)
{
// this method is limited to 2^32 byte files (4.2 GB)
FileStream fs = File.OpenRead(fullFilePath);
try
{
byte[] bytes = new byte[fs.Length];
fs.Read(bytes, 0, Convert.ToInt32(fs.Length));
fs.Close();
return bytes;
}
finally
{
fs.Close();
}
}
Of course this is just a sample and you should take of security and parameter checking. In this sample I have left this stuff out just to keep it as simple as possible.
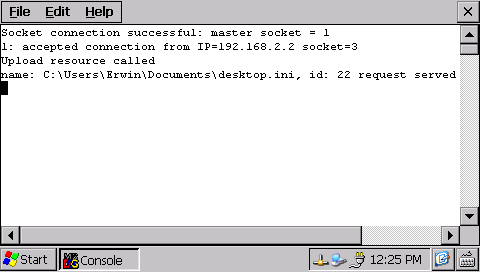
When you run the HelloWorldWebservice on the target device and run the C# Client sample on your pc, a file open dialog will appear when you click on the "Upload File" button. Select a file (I just selected desktop.ini) and it will upload the contents of that file to the webservice on the target.
If you implemented everything correctly you should be seeing the following output on the target:

That's it!
To recap: To modify or extend your webservice, create/modify the wsdl. Compile the wsdl file, compile the header file. Implement the native webservice. When that's done, modify your client by refreshing the imported wsdl file and you can call your new webservice.
Happy 2012 to all our readers!
| Attachment | Size |
|---|---|
| 838 bytes |


