[An updated version of this post for WEC2013 can be found here]
A question that keeps coming back on the newsgroups is "I changed some code, but it does not end up in my image", or "I changed some registry values in platform.reg, but if I look at the device registry, it's not there!".
The source of these problems is build-related. You've got to understand the build system in order to know exactly what to do. This blog post aims to give you a clear handle on "What to build when"!
The first and most important thing to do is to delete two options from the Platform Builder Build menu: Build and Sysgen and Rebuild and Clean Sysgen. These commands will build the entire tree (so including any source in PUBLIC and PRIVATE). For us normal developers these commands do not make any sense. If you're not in the CE development team working at Microsoft you simply don't have all the source code. Rebuilding the entire tree may work, but it will override any installed QFE (QFE's contain updated binaries and sometimes, but not always, updated source code). After rebuilding the entire tree you will sooner or later encounter strange errors that are either very hard to fix, or just impossible to fix. There is no way to revert back to a clean tree once you've done a (Re)Build and (Clean) Sysgen. The only way is to completely remove Windows CE and reinstall. Don't forget to reinstall all QFE's after that as well (download the QFEInstaller tool to help with that).
Now you know why you often see me shouting NEVER EVER DO A BUILD AND SYSGEN! in the newsgroups...
UPDATE: The instructions for removing the bad build commands from the menu are for Windows CE 5.0/6.0. For instructions on Windows Embedded Compact 7 read this. Note that the below "What to build when" instructions are STILL VALID for WEC7 AND WEC2013!

The original Advanced Build Commands menu
- Step 1.

Right click on the toolbar and click Customize...
- Step 2.
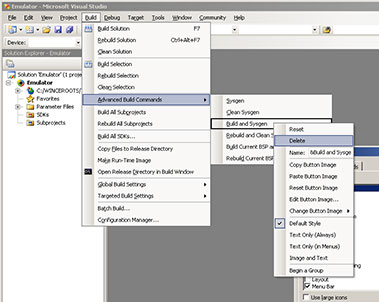
Click on menu Build, submenu Advanced Build Commands, then right click on Build and Sysgen and click Delete
- Step 3.
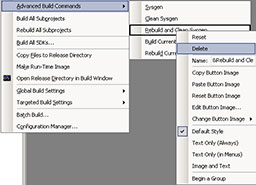
Do the same for Rebuild and Clean Sysgen
- Step 4.
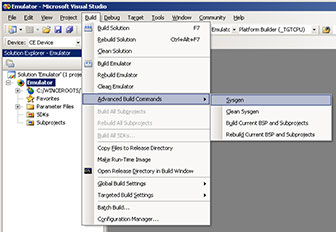
Close the Customize window. The Advanced Build Commands menu should now have only 4 options: [Sysgen], [Clean Sysgen], [Build Current BSP and Subprojects] and [Rebuild Current BSP and Subprojects].
If you are still using Platform Builder for Windows CE 5.0 the instructions stay the same except the Build menu is Build OS and there's no submenu (everything is under the Build OS menu).
I know that some developers working with CE change code in the PUBLIC and PRIVATE trees. If you do that you need to do a build and sysgen to include your changes in your kernels BUT: You will end up with a corrupted CE installation. If you need to change PUBLIC or PRIVATE code you have to clone the code. Cloning code is in most cases not much more than a simple copy. Copy the sources you want to change to a folder in your BSP, change the sources file so that it builds a DLL instead of a lib and voila, you're done. I know I make it sound easier than it is, but taking a shortcut and modifying code in the PUBLIC or PRIVATE trees will prove to be a long way around in the long run.
Phew! Now that we got that out of the way let's see what build command we've got to use in what situation:
- Create a new OS Design (or add a new build configuration to an existing OS Design): Sysgen (Build Solution)
Since a new OS Design doesn't have anything in its build configuration's output folders (same with a new build configuration) you'll have to sysgen the entire solution (for that build configuration). The longest process, but luckily you don't have to do this many times (see below).
- Change Platform Settings: Make image
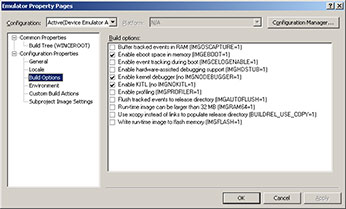
If you change any Platform Settings (like IMGNOKITL, IMGNODEBUGGER, IMGPROFILER) all you have to do is a Make Image.
- Change driver source code in your BSP: Build the driver and Make Image
If you change driver source code, all you have to do is just build the driver (WINCEREL must be set to 1 but it is set by default so unless you changed it there's no need to worry) and do a makeimg. If you only want to debug the driver you can also add the DLL to the Release Directory Modules list (menu Tools) and just restart the device (or reload the device driver on the device) without having to do a makeimg and download to device. Building just the driver is a simple right-click on the driver and Build in the IDE or "build" in the driver's folder on the command line.
- Change multiple source code files in your BSP: Build the BSP and Make Image
The safe option, this way you can't forget to rebuild anything. Building the BSP is a simple right-click on the PLATFORM\BSP folder and Build in the IDE or "build" in the BSP's root folder on the command line.
- Change platform.reg, bib, dat or db files in your BSP: Sysgen BSP, Copy Files to Release Directory, Build All Subprojects and Make Image
A lot of steps, but this will still not take longer than a couple of minutes. If you change any of the platform.* files we need to re-filter (Sysgen) those files and make sure the filtered files are copied into the FLATRELEASEDIR (Copy Files to Release Directory). That last action did however clear the project binaries from the FLATRELEASEDIR so we need to make sure those binaries and settings are getting copied into the FLATRELEASEDIR again (Build All Subprojects) and finally we are ready to Make Image. Now your registry changes will be in the image (check reginit.ini to make sure, last entry wins).
- Change some source files and platform.reg, bib, dat or db files in your BSP: Build and Sysgen the BSP, Copy Files to Release Directory, Build All Subprojects and Make Image
Only difference with previous situation is that you now have to build the BSP to include the source code changes.
Please note that "Build and Sysgen the BSP" is not the evil "Build and Sysgen" command. The evil command is only in the Build menu (and should not be anymore if you followed the instructions above). The "Build and Sysgen BSP" command can be executed by right clicking your BSP root node in the Solution Explorer and choosing "Build and Sysgen (cebuild -qbsp)". Notice the -q in that command? That shows you it's a good command...
- Change the workspace configuration (add or delete a component): Sysgen the entire workspace (Build solution)
For most components a simple Sysgen is enough. For some components (like when changing from RAM based registry to Hive based Registry) a Clean Sysgen is needed. This action takes the longest (anywhere from 5 minutes for a small workspace configuration on a very fast machine to a couple of hours for a really big configuration and a very slow machine). A Sysgen is a right-click on the workspace, Advanced Build Commands->Sysgen in the IDE or "blddemo -q" on the command line.
- After installing one or multiple QFEs: Clean Sysgen the entire workspace (Rebuild solution)
To make sure all components are re-linked with the (possibly updated) libraries a Clean Sysgen is needed. This action takes the longest (anywhere from 5 minutes for a small workspace configuration on a very fast machine to a couple of hours for a really big configuration and a very slow machine). A Clean Sysgen can be performed by choosing Rebuild Solution from the build menu, or choosing Advanced Build Commands->Clean Sysgen in the IDE or "blddemo clean -q" on the command line.
Sometimes it's easier to build from the command line. If you are unsure what command to type you can always perform the action in the IDE first and watch the 3rd line in the build output window starting with "Starting Build:". Behind the colon is the exact command line for that action, eg Sysgen on the BSP: "Starting Build: SysgenPlatform %_TARGETPLATROOT% preproc&&SysgenPlatform %_TARGETPLATROOT% postproc", so on the command line you would type "SysgenPlatform %_TARGETPLATROOT% preproc" followed by enter and the 2nd command "SysgenPlatform %_TARGETPLATROOT% postproc" followed by enter.
If you use the commandline, make sure you never forget "-q" when running "blddemo" as "blddemo" without "-q" is a Build and Sysgen!
I hope this blog post will help you speed up your builds and lower your frustration with the build system!
Good luck!

 I should've been excited about that and used an exclamation mark on that last sentence, but how can I be excited about a system that has to be rebooted every 6 hours? I can imagine an already nervous passenger would become very nervous when he realizes even something simple like the in-flight entertainment system crashes!